1 - Inside of any data collection screen choose the Settings Icon in the top right corner of the screen.
Choose an existing filter from the Drop Down Menu or select the Pencil Icon to open the Filter Menu.
OR
2 - Choose SETTINGS from the home screen and select FILTERS.
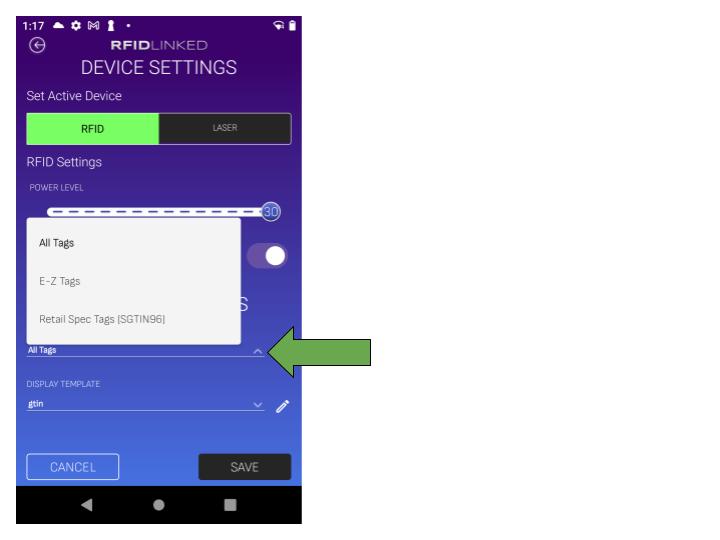
There are three filters pre-installed in the RFIDLinked app.
1 -All tags - reads all tags with no filter conditions.
2 - Retail Spec Tags (SGTIN96) - reads only UPC/EPC based tags that follow the SGTIN96 standard used for retail compliance.
3 - E-Z Tags - reads only tags printed in the RFIDlinked app in the Simplified Tag Printing section. These are user custom built tags for inventory and asset management.
* - Out of the box, the default All Tags filter is applied meaning that all RFID tags within range of the scanner will be read.
Choose ADD in the top right of the search bar to create your own custom filter if one of the pre-loaded options does not apply to your use case.
NAME (required) the new filter and add any NOTES (optional) you want to attach to the filter and then choose ADD GROUP.
Choose the + Symbol to the right of “Match Group: Match Any”.
Choose the Pencil Icon to open the Edit Filter Criteria screen.
Use the drop-down under FIELD to choose the unique piece of information that you want to set as the basis of your filter.
* - A more detailed explanation of each FIELD value can be found HERE.
Use the drop-down under OPERATOR to select the condition that you want to set your filter to look for.
* - A more detailed explanation of each OPERATOR value can be found HERE.
Type or use the barcode scanner to scan in the Alphanumeric string you would like to filter for using the criteria you have chosen into the VALUE field and then select UPDATE.
* - In the example below the FIELD is UPC number, the OPERATOR is Contains, and the VALUE is 858176. This will return only tags that have the value 858176 somewhere in the UPC value (in this case it would be searching for all tags by the human readable Company ID from a UPC code).
You can add additional conditions to your filter by hitting the + arrow next to "Match Group: Match Any" as mentioned above if you need.
Once you have completed your filter choose SAVE to return to the Filters Menu.
Click the GEAR ICON by your new filter to open the options menu.
Choose APPLY FILTER to lock your filter in place.
Your new filter will turn green to verify that it has been applied.
If accessing the filter settings menu from a Scanning Session, hit the BACK BUTTON in the top left of the screen to return to the Device Settings menu.
Verify your Power Level and your Display Template are correct and choose SAVE to return to your scanning session with your filter applied.
If accessing the filter settings menu from the Home Screen Settings menu, just hit the BACK BUTTON in the top left twice to return to the home screen and begin a new scanning session.
When you open a new scanning session (or return to an old one) you will receive a POP-UP at the bottom of the screen telling you which filter is being applied.
* - Once you have applied a filter it will remain applied until you manually change to a different one.