Label Designer Overview
RFIDLinked’s Label Designer is a WYSIWYG (What-You-See-Is-What-You-Get) label editor for creating custom print templates for RFID tags. It enables you to visually construct label designs without having to learn ZPL programming.
Label Designer has the ability to set your label dimensions, place text, 1D barcodes, QR codes, and images. For text, barcodes, and QR codes It supports both static values and dynamic values pulled from the RFID tag data being printed - For example, serial numbers, product definition name and description, custom field values, etc...
The Label Designer supports a wide range of label sizes and includes a set of predefined recommended templates you can use as a starting point, or the ability to design a completely custom layout from scratch.
Supported Features
Label Sizes
Supports custom label sizes from 20mm - 102mm wide and 10mm - 102mm tall (0.8"–4" wide, 0.4"–6" tall).
Industry Standard Templates
Start from an industry standard template and modify it as needed, or start from scratch with your own totally custom layout.
Text Fields
Add static labels or dynamic values
such as serial numbers, product definitions, and custom fields.
Adjustable font sizes, positioning, and alignment.
2D Barcodes / QR Codes
Encode static or dynamic values into barcodes and QR codes, with customizable placement and size.
Images and LogosInsert images from our standard library (for example RFID and EPC logos), or upload custom graphics such as your own company branding.
Create a New Design
To get started with creating a new label design, select Label Designs from the left navigation tree, and then click on the Create link.
You will then be prompted to select between Start from a Template or Create from Scratch. If you would like to start designing from one of RFIDLinked's predefined industry standard layouts, select Start from a Template. This will give you a head start on putting together an attractive design, but you will have the ability to completely customize it for your own needs. Alternatively, selecting Create from Scratch will allow you to enter the dimensions of your RFID tags, and start from a blank canvas.
Using the Designer
Once you've selected to create a new layout, you will be presented with the label design workspace. Your label is presented front and center, with a toolbox on the right side.

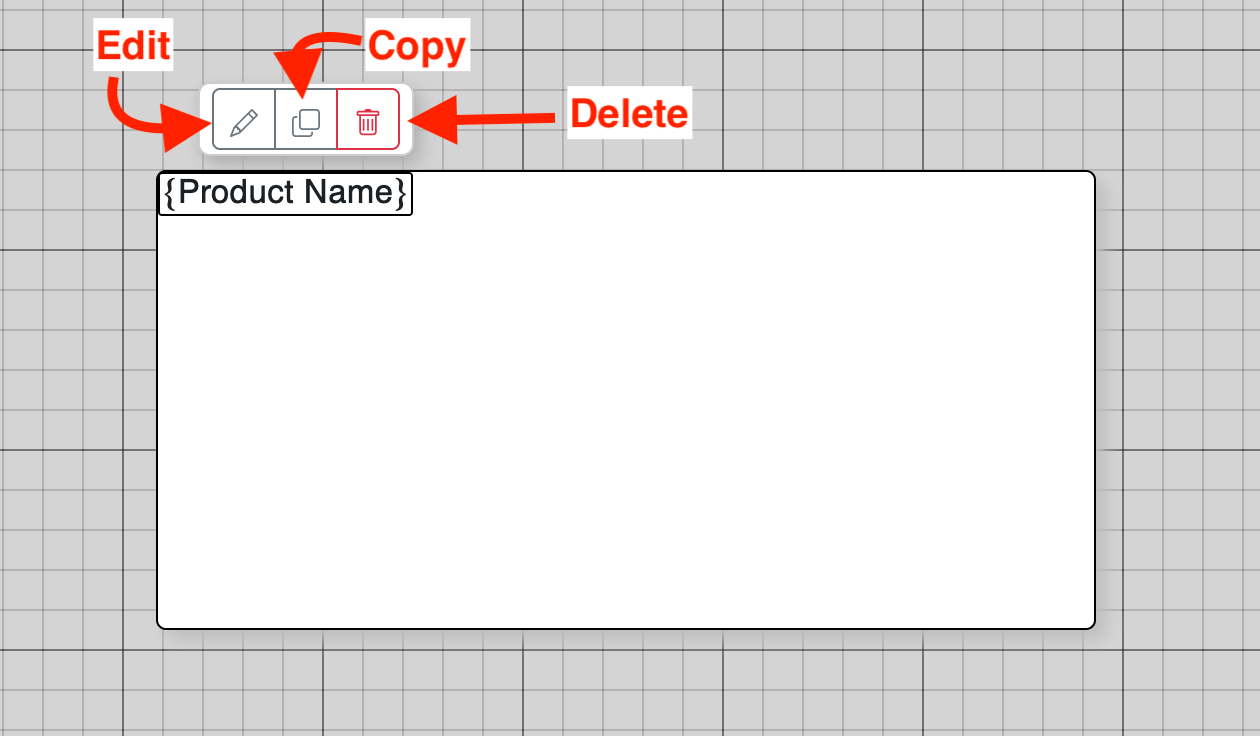
To add a new component to your label, click the desired component from the toolbox and it will be placed onto your label. To make adjustments to the component click on it and a menu will appear above the component with three actions: Edit, Copy, or Delete.
Edit will allow you to adjust the properties of the selected component.
Copy will create a copy of the component and place it onto the label.
Delete will remove the component from the label.
By clicking and dragging the component you can adjust where it is placed within the label.

Label Components
To learn more about each label component type, jump to its knowledge base article:
-
Static Text - Constant text value.
-
Tag Field - Dynamic text value rendered from the tag being printed.
-
Barcode - 1D or QR Code.
-
Logo - Add Images to the label.